Optimize your notification rules so users don't get multiple messages for a single action.

The trick for avoiding multiple notifications is to either:

Have rules for "On Edit" and "On Task"

OR

Have rules for "On Change of Status" and "On Change of Assignment"

This Knowledge Base Article explains the details.

Tracker has a lot in common with the beautiful game's biggest tournament.

FIFA World Cup 2018

Unite People Without Having to Be in the Same Location

You can enjoy the World Cup from the comfort of your own device. The same is true of Tracker. All you need is a browser to access it from anywhere in the world. You don't need a conference room, you don't need a meeting...just login and see what's happening.

See the Stars and Learn New Tricks

Your organization's departments have their own Messi, Neymar or CR7. Tracker gives you a front row seat to their jawdropping customer saves and out-of-the-box solutions. A Tracker report can serve as a meeting agenda for a weekly/monthly staff meeting to review noteworthy actions.

You can also learn what not to do. Since Tracker has a complete & searchable audit trail, it's easy to conduct a post-mortem when needed.

Anything Can Happen

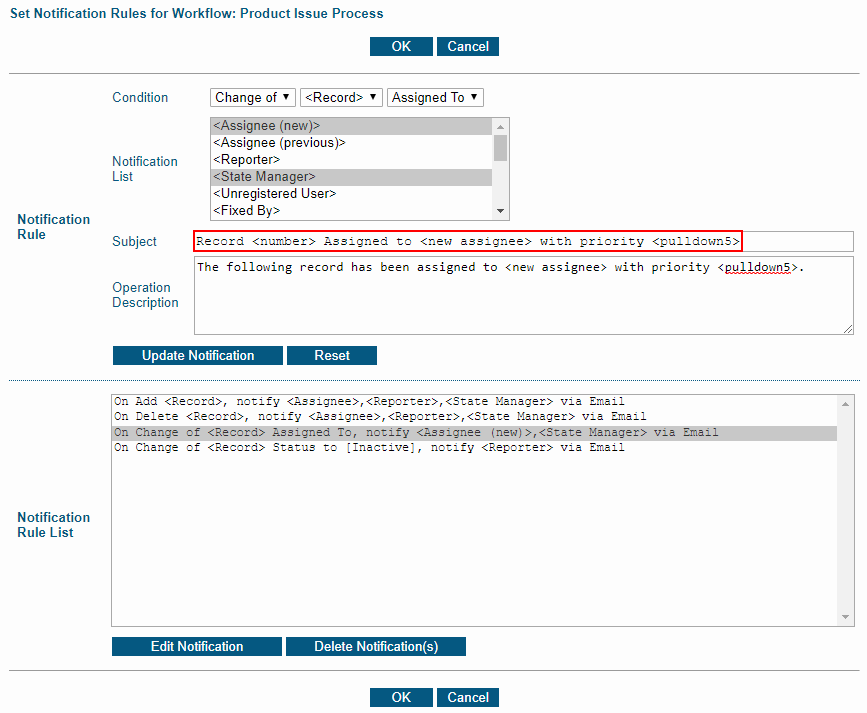
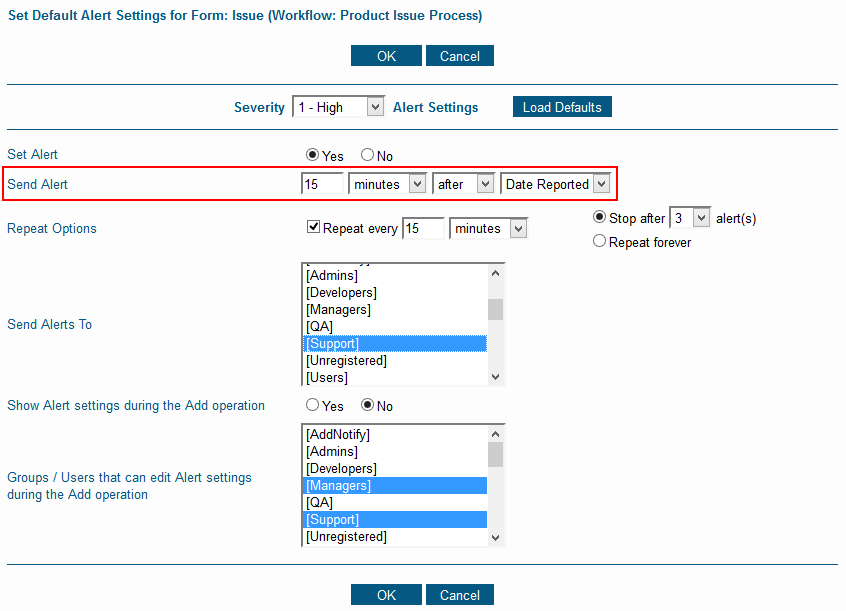
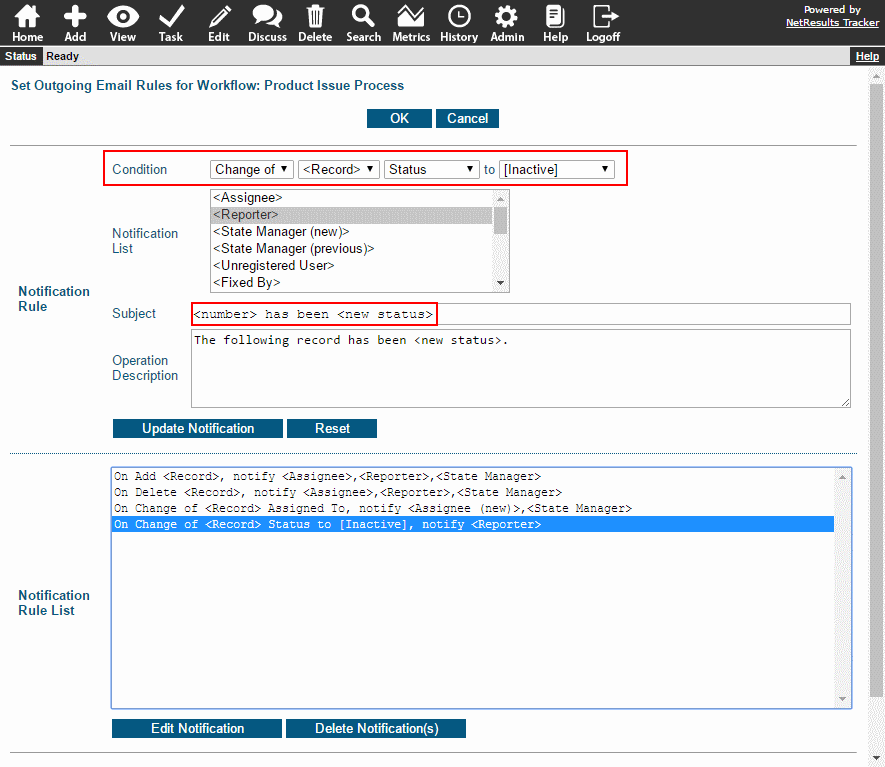
A reversal of fortune can happen in a single flick of the ball in stoppage time. Tracker's alerts & email notifications help you stay on top of changes so you can respond immediately.

Use variables to include details like assignee or priority in the subject line of a notification message.

Use a Custom Subject Line

The subject line of notifications triggered by actions performed in Tracker can be customized to include detail from the record that was modified. For example, the image above shows the subject line of a message that will be sent when a record is re-assigned.

The Admin Help Guide contains a list of variables that can be used in notification rules. The notes below the table explain how to call out other fields not listed in the table (e.g. a pulldown other than status or assignee).

For detailed steps on modifying rules, review the Notification Rules section.

Alerts can be sent and repeated in 15 minute increments.

If you're using Alerts to regulate response times, you can trigger notifications in 15, 30 or 45 minute increments in Version 7.0 or newer.

Severity 1 Issues

You can set Alerts such that when a severity 1 issue is reported, it can trigger an alert every 15 minutes until someone takes action on the issue.

Severity 1 Example

To configure alerts this way, check out the based-on alerts blog post for details.

Information about upgrading to Version 7.0 or newer can be found on the downloads page.

Use a single email rule to cover notification for a group of similar states.

Let's create a state group for "Inactive" states: Deferred, Closed, Released, Duplicate. We can then set up one email rule that will notify the reporter in any of those cases.

Email Rule for Inactive States

To add a state group:

  1. Login as Admin and click on the Admin icon.
  2. Click on the Workflows link.
  3. Click on the Global States button.
  4. Click on the State Groups button.
  5. Click on the Add State Group button.
  6. Enter a name and click OK.
  7. Click on the Add States to this State Group button.
  8. Click on a state and click on the Add button. Repeat to add each desired state. Then, click OK.

State Groups

Add an email rule that uses the new state group:

  1. Login as Admin and click on the Admin icon.
  2. Click on the Workflows link.
  3. Locate the Outgoing Email Rules section and click on the Manage link to the right.
  4. For Condition, select "Change of", "<Record>", "Status", to "[New State Group]".
  5. For Notification List, select the users and/or groups that should be notified. To select multiple users and groups, hold down the Ctrl button on your keyboard as you select the desired users and groups.
  6. Enter a Subject and Operation Description. Variables can be used to customize the content included in these parts of the email notification message. Using the "Inactive" states example, the Subject can be something like "<number> has been <new status>" where <number> will fill in the record number and <new status> will fill in the state to which the record is being routed. The Operation Description can use similar wording: "The following record has been <new status>."
  7. Click on the Add Notification button to save the email rule to the Notification list. Then, you must click OK to fully save the new rule and return to the Workflows page.

More details can be found in the Email Rules Help section.