See a breakdown of items assigned to each team member with a workload chart.

Workload Chart

Add this report to your Home Page to easily access this information at any time.

You can also breakdown the data down further as we did to show Severity in this chart.

Workload Chart with Severity Breakdown

Take a peek at the settings we used to make this chart.

Workload Chart Settings

Steps for adding a chart can be found in the Metrics section of the Online Help Guide.

To add the report to the Home Page:

  1. Login to Tracker.
  2. Click on the Preferences link in the upper right corner.
  3. Select the chart for one of the Home Page Report options.
  4. Click OK to save the change.

Display saved searches on the KB Search Page for end users to easily access key information.

The Quick Links section on the Knowledge Base Search Page lets you save a Knowledge Base search and display a link so users can access the results in one click. You can use a quick link to display an FAQ list or some other group of articles that you want to make available.

Sample Quick Links

Create a Quick Link

  1. Login as Admin and click on the Admin icon.
  2. Click on the Knowledge Base link.
  3. Click on the Contents button to the left of Search Page.
  4. Click on the Modify Links button to the left of Quick Links.
  5. Enter a name in Quick Link Label.
  6. Set the order with respect to other quick links.
  7. Set the search criteria for the Quick Link.
  8. Click Add to save it.

The quick link below will return KB articles that are set with "FAQ" and "Our Database".

Criteria

Check out the Online Help Guide for more information about the Knowledge Base.

Give your customers, partners or vendors the ability to check the status of their tickets at any time.

End users that need to monitor the progress of the tickets they've reported can make use of Restricted user accounts. Restricted users are automatically set up to show only them the tickets they've reported, preventing users from seeing tickets that belong to other customers or contain internal information. This is done without any extra set up by the Administrator.

Restricted User Home Page

You can customize the fields displayed on the Add Page and these can be different than what internal users see (e.g. have these user fill out fewer fields than internal users).

Restricted User Add Page

Provide options for these users to provide more information or close a request that's no longer needed.

Restricted User Transitions

Check out the following video for more information about Restricted Users.

Adding another process or project to Tracker is easy, allowing you to incorporate additional procedures or organizations into your system.

Project Hierarchy

Tracker supports an unlimited number of projects. When creating a project, you can configure which user groups are allowed to access the project as well as the privileges available (e.g. ability to create/modify/query for records). This allows you to keep a project isolated. Or, Link Fields can be used to cross-reference records in different projects.

Project Visibility

Forms and Workflows

You can customize the forms and workflows that will be used in each project.

Multiple Forms in a Project

Examples

  • Another department in your company wants to use Tracker for their processes.
  • You're launching a new product that has a team and/or procedures that are independent of existing products.
  • You're using Tracker for a customer-facing process and want to add a Knowledge Base.
  • Your company acquired another one and you need to add some new processes.

How to Add Projects or Processes

The Getting Started Guide available for the cloud service or on-premises installations provides detailed steps for setting up a new project or process. It also provides suggestions for defining a brand new process, if that's needed.

Need Help?

If you need some pointers to getting started or have some questions about your situation, contact Technical Support. Or, you can have our Professional Services team set it up for you.

Send a record back to a previous workflow step and automatically assign it to the person who worked on it at that point.

In a QA step or user acceptance testing, a record may need to be sent back for re-work. Tracker has workflow options that will automatically route the record back to the user who worked on it.

Transition Options

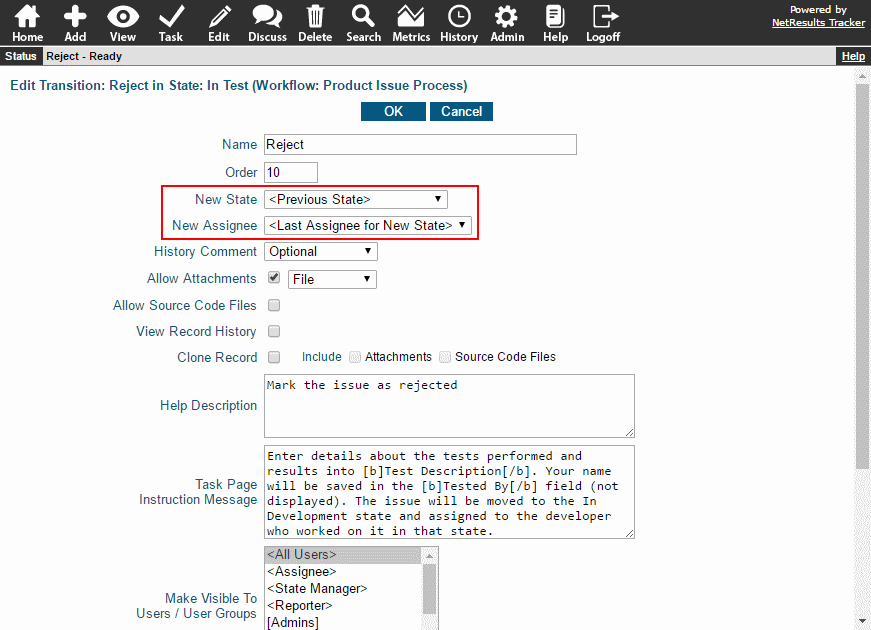
Send Back to a State

To send a record back to a state, set the transition with the New State option set to "<Previous State>". Tracker will use the record's history to find the appropriate state. Or, you can select a specific state name instead if the state you want isn't the last one.

Send Back to a User

Send a record back to the user who worked on it using the "<Last Assignee for New State>" option in New Assignee. There's also an option called "<Last Assignee for State X>". This is useful in cases where the record will be routed to a state it hasn't previously been through. For example, a fix fails testing and gets sent to a state called "Rejected", but you want to assign it to the user who fixed it while it was "In Development". Select Rejected for New State. Then, for New Assignee, pick "<Last Assignee for State X>" and choose "In Development" for X.

For more detail about workflow routing options, check out the Transition Properties section of the Online Help Guide.