Sometimes when adding a new user, you might find that it already exists in the system.

User Already Added

Look for the user in the Add Existing Users section.

Add Existing Users

To add an existing user:

  1. Login as Admin and click on the Admin icon.
  2. Click on the User Accounts link.
  3. Click on the Add User button.
  4. Click on the Add Existing Users link in the upper right.
  5. Click on the existing user you would like to add and select any user groups to which you want to add the user. To select multiple groups, hold down the Ctrl button on your keyboard while selecting the groups.
  6. Click on the Add button.
  7. Click OK to confirm.

Add Existing Users List

More information can be found in the User Accounts section of the Online Help Guide.

Streamline what your end users see in Tracker.

What end users see when they first login to Tracker can help keep them focused on what's important. These tips will help you guide them to do their part in your process as effectively as possible.

Display Only 1 Home Page Report

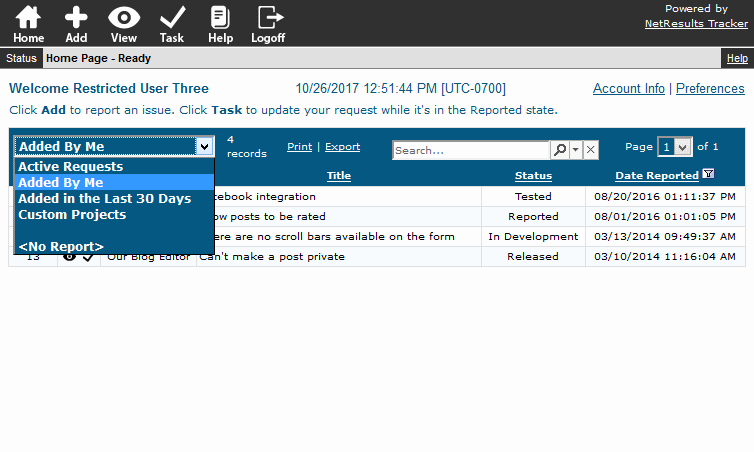
Up to 3 reports can be displayed on the Home Page. However, customers or other external users using the system to submit requests or perform a specific action can benefit from seeing a single report that shows only what needs their attention.

One Report

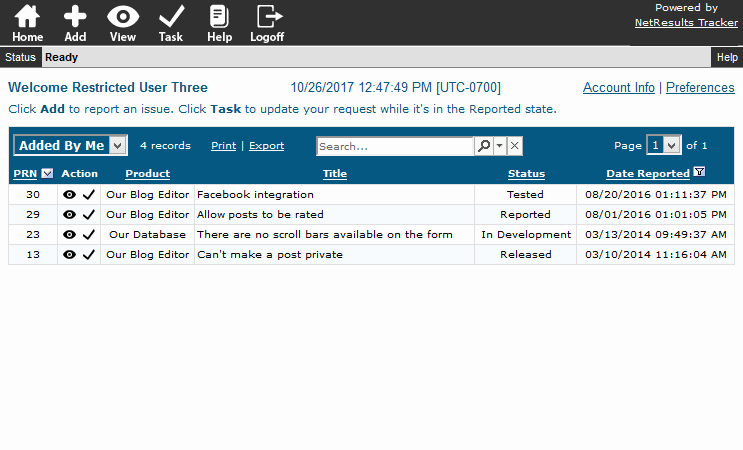
You can still give them access to additional reports. The users can click on the name of the report to see all of the reports you've made available to them.

Report List

Minimize the Columns

It's also useful to keep the number of columns to a reasonable number such as 5 or 6. To see the full details of a request, the user can click on the View icon next to the request. This blog post explains how to set the fields displayed in a report.

Show the First Few Results

Just show the first 10 records to keep the view uncluttered. Having good sort options will ensure the most important items are displayed at the top.

To set the Maximum Records Per Page option:

  1. Login as Admin and click on the Admin icon.
  2. Click on the User Preferences link.
  3. Select the user type and click Continue.
  4. Set the Maximum Records per page option and click on the "Update & Push to Selected User Groups" button to apply the change to the users.
  5. Select a user group. To select multiple groups, hold down the Ctrl button on your keyboard as you select the groups.
  6. Uncheck the options that should not be changed, then click OK.

Maximum Records Per Page

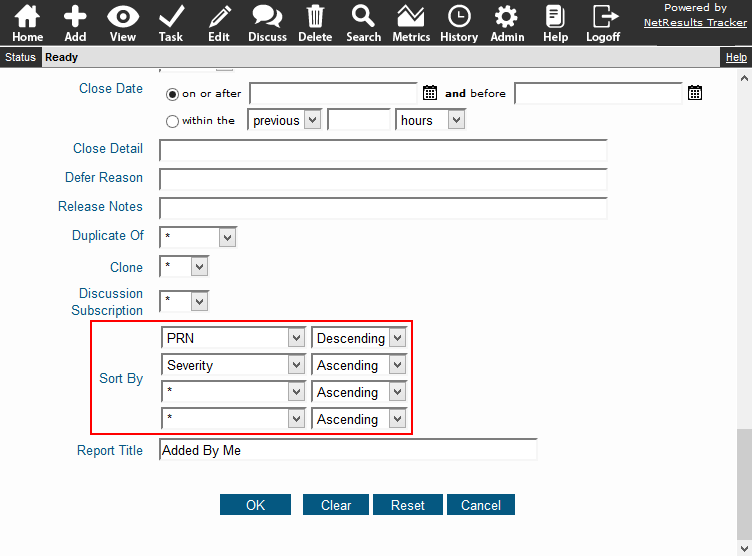
To set the sort options in a report:

  1. Login and click on the Search icon.
  2. In the Saved Queries pulldown at the top, select the report you wish to modify, then click on the Edit button to the right.
  3. Scroll down to the bottom to set the Sort options.
  4. Click OK to save the changes.

Sort Options

More tips for optimizing the end user experience can be found in this post.

Make use of the Checkbox style option available for YesNo fields.

Checkbox

To create a YesNo field and display it as a checkbox:

  1. Login as Admin and click on the Admin icon.
  2. Click on the Fields link.
  3. Click on the Add Field button.
  4. Select YesNo and click Continue.
  5. Enter a name for the field in "Label". Set the Display Style to "Checkbox" and set the other available options.
  6. Click OK to save the field.
  7. Click on the Manage Forms for this Field button to add the field to the desired form.
  8. Click on a form and click on the Add button.

Ensure important data is gathered by making a field required.

You can require information to be entered or a value other than the default be selected in a field by configuring it to be required on the Add and Submit pages or during the Task operation.

Set a Field to be Required on the Add or Submit Pages

  1. Login as Admin and click on the Admin icon.
  2. Click on the Fields link.
  3. Click on the Edit button to the left of the field.
  4. Set the option "Required for Add & Submit" to "Yes" and click OK.

Require on Add & Submit Pages

Make a Field Required During the Task Operation

  1. Login as Admin and click on the Admin icon.
  2. Click on the Workflows link.
  3. In the pulldown at the top select the desired workflow.
  4. Locate the States section and click on the Manage link to the right.
  5. Click on the state that contains the transition you wish to modify, then click on the Transitions button.
  6. Click on the Task Fields button to the left of the desired transition.
  7. Click on the field to be changed, then click on the Edit button.
  8. Set Input Type to be "Required", then use the information in the Task Field Properties Help section to set any related options.
  9. Click on the Update button to save the changes.

Require during Task

Use a single email rule to cover notification for a group of similar states.

Let's create a state group for "Inactive" states: Deferred, Closed, Released, Duplicate. We can then set up one email rule that will notify the reporter in any of those cases.

Email Rule for Inactive States

To add a state group:

  1. Login as Admin and click on the Admin icon.
  2. Click on the Workflows link.
  3. Click on the Global States button.
  4. Click on the State Groups button.
  5. Click on the Add State Group button.
  6. Enter a name and click OK.
  7. Click on the Add States to this State Group button.
  8. Click on a state and click on the Add button. Repeat to add each desired state. Then, click OK.

State Groups

Add an email rule that uses the new state group:

  1. Login as Admin and click on the Admin icon.
  2. Click on the Workflows link.
  3. Locate the Outgoing Email Rules section and click on the Manage link to the right.
  4. For Condition, select "Change of", "<Record>", "Status", to "[New State Group]".
  5. For Notification List, select the users and/or groups that should be notified. To select multiple users and groups, hold down the Ctrl button on your keyboard as you select the desired users and groups.
  6. Enter a Subject and Operation Description. Variables can be used to customize the content included in these parts of the email notification message. Using the "Inactive" states example, the Subject can be something like "<number> has been <new status>" where <number> will fill in the record number and <new status> will fill in the state to which the record is being routed. The Operation Description can use similar wording: "The following record has been <new status>."
  7. Click on the Add Notification button to save the email rule to the Notification list. Then, you must click OK to fully save the new rule and return to the Workflows page.

More details can be found in the Email Rules Help section.