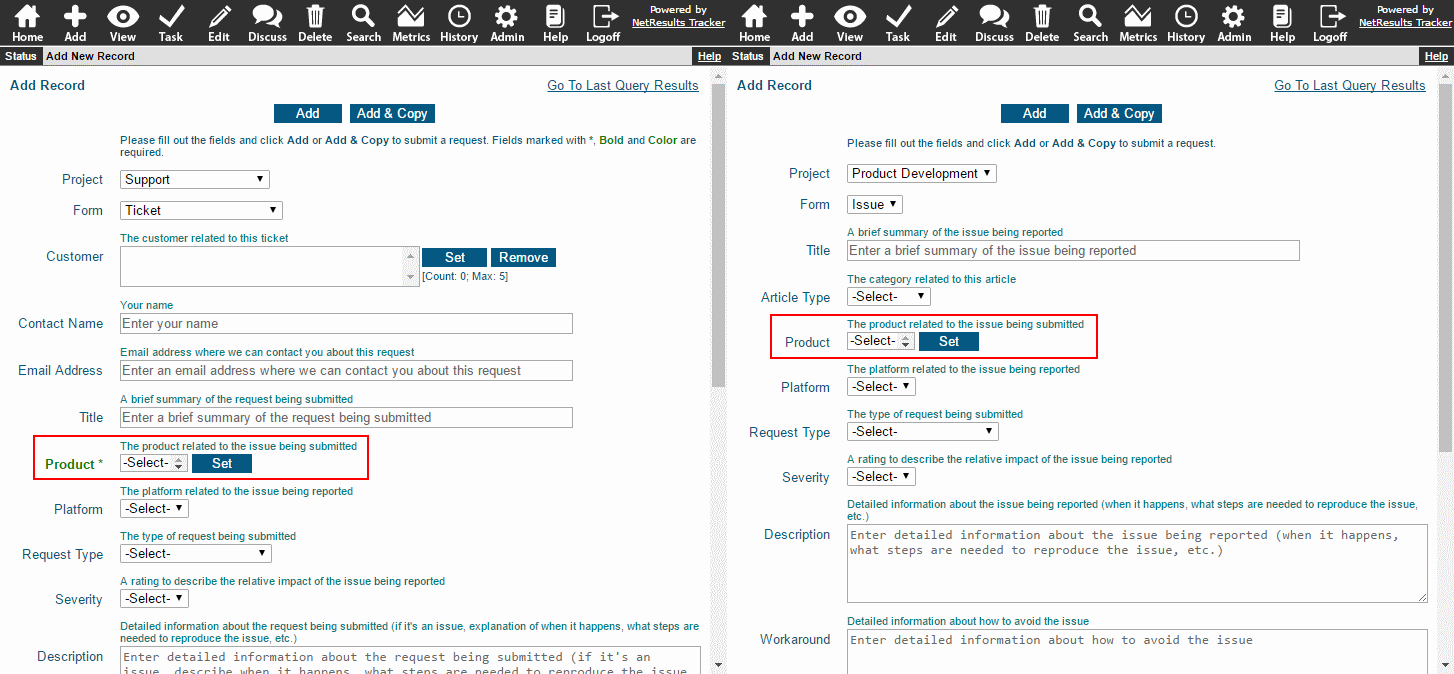
A field used on more than one form can have different properties on each.

The Product field is required on the Support Ticket (left) and optional on the Product Development Issue forms below.

Field on Multiple Forms

By default, a field uses global field properties. These are the options as set when you click on the Admin icon, click on the Fields link and click on the Edit button to the left of a field. However, you can set the field to use different properties using the steps below.

To set a field to use different properties on a specific form:

  1. Login as Admin and click on the Admin icon.
  2. Click on the Fields link.
  3. Click on the Forms button to the left of the field.
  4. Click on the form, then click on the Edit button.
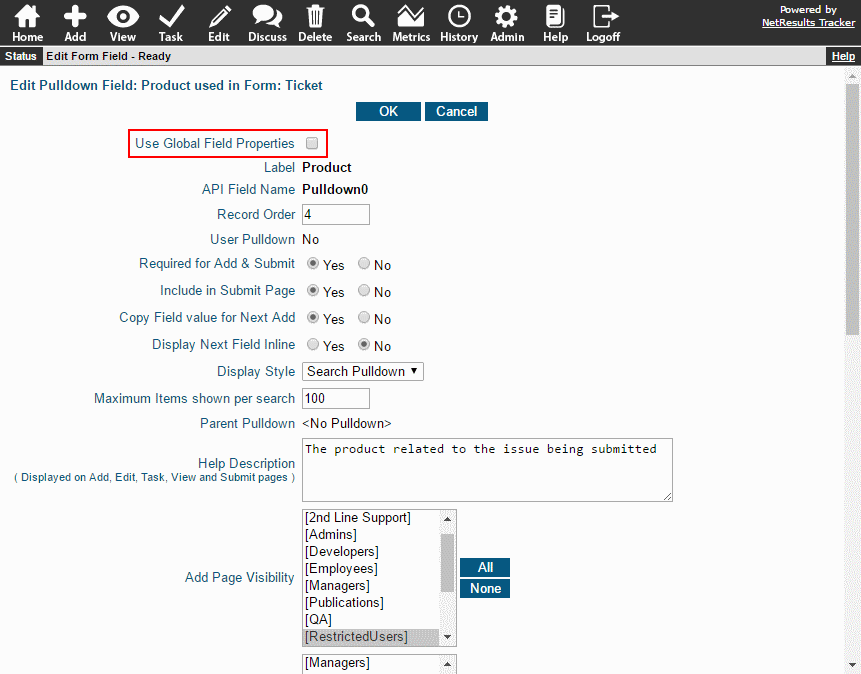
  5. UNcheck the Use Global Field Properties box at the top.
  6. Make changes to the field properties, then click OK to save them.

Non-Global Field Properties

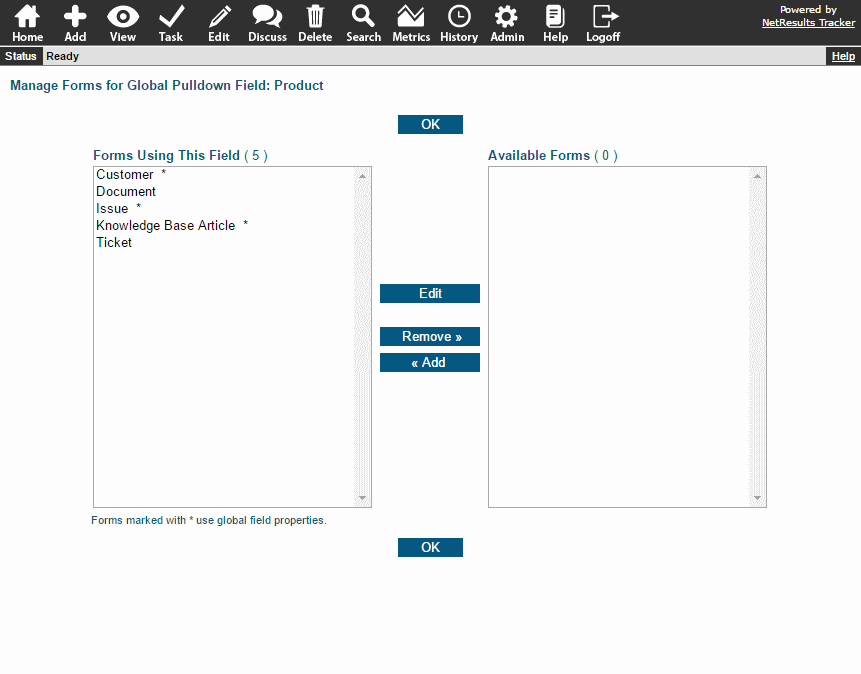
The list of forms that includes this field indicates which forms are using global properties with a *.

Form List

Fields can be initialized with a value on the Add Page or in a later workflow step.

Save an Important Date

You can set a date field with the current date and time to capture when an action happened. For example, most of Tracker's templates have a Date Reported field that saves the date and time the record was created and can be used to generate reports. You may want to save other dates such as the date something was approved or closed.
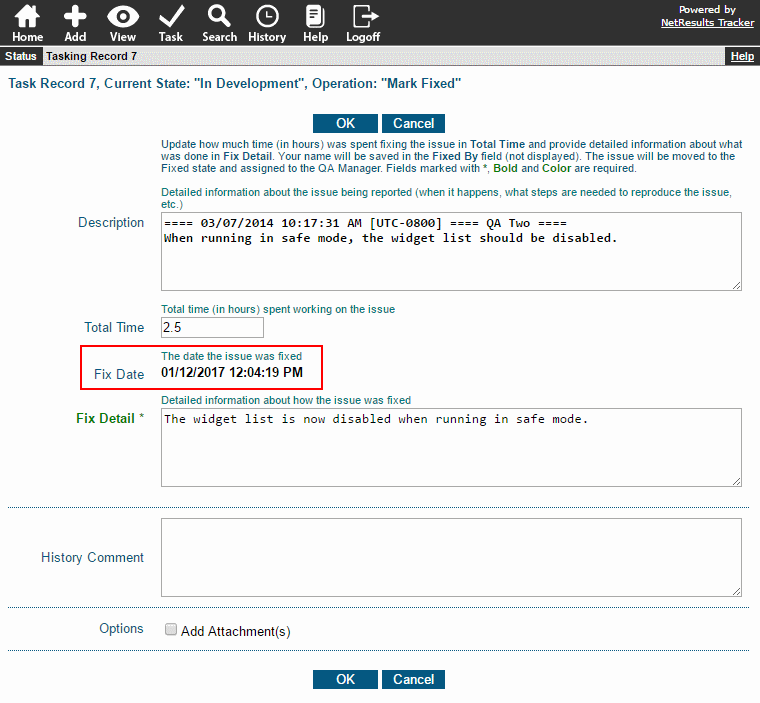
Initialize a Date Field

Date fields can also be set with values relative to other date fields (e.g. 2 days after Date Reported, 1 day before Due Date).
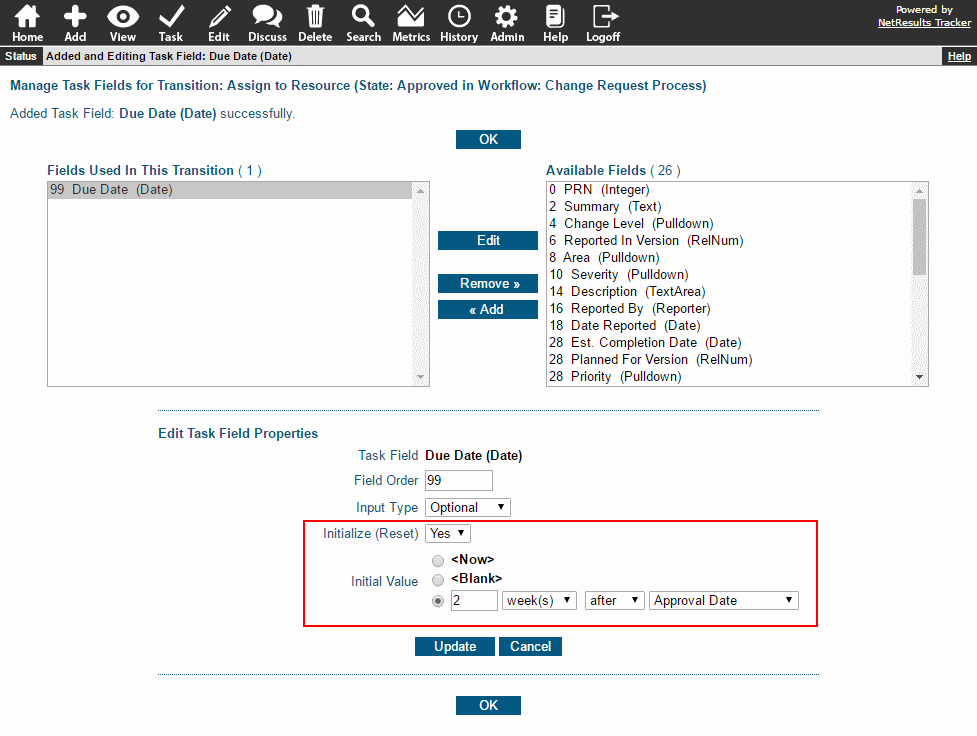
Initialize with a Relative Date

Format a Text or TextArea Field

You can have a value saved in the field automatically. In the sample below, we've saved some text so users can enter information into the field using a specific format.
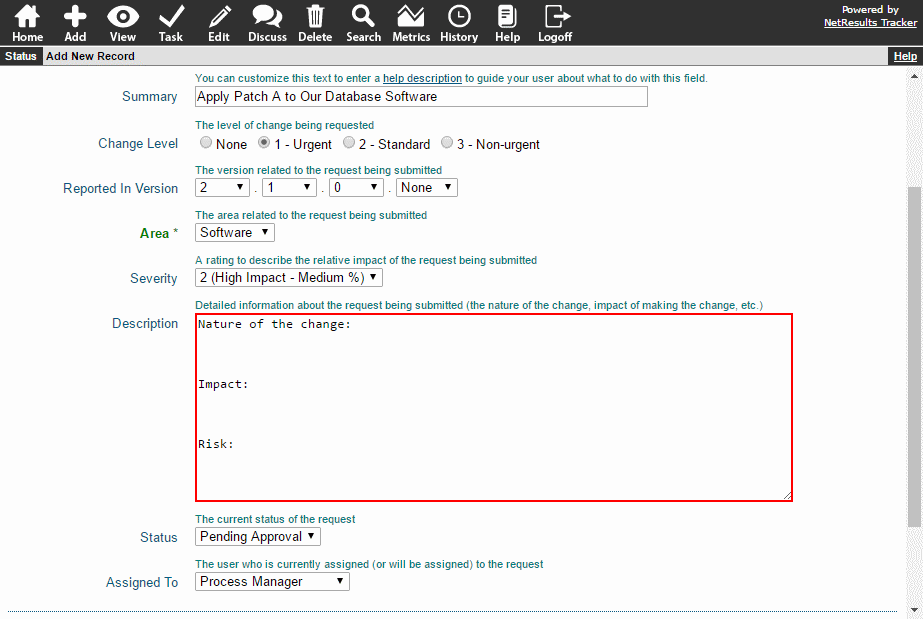
Initial Value in TextArea Field

Other Field Types

Most fields can be initialized including Floating Point, Integer, Pulldown, Url and YesNo fields.

An Important Caveat

Initializing a field means you're clearing out the existing value and setting it to something else. If you've already saved some text in a field and then are initializing it at some point in the workflow, any text already in the field will be deleted.

Set a Field On Add

To initialize a field when a record is added:

  1. Login as Admin and click on the Admin icon.
  2. Click on the Fields link.
  3. Click on the Edit button to the left of the desired field and set the property listed below based on the field type:
    • Date fields: Set the Initialize on Add property to "Yes".
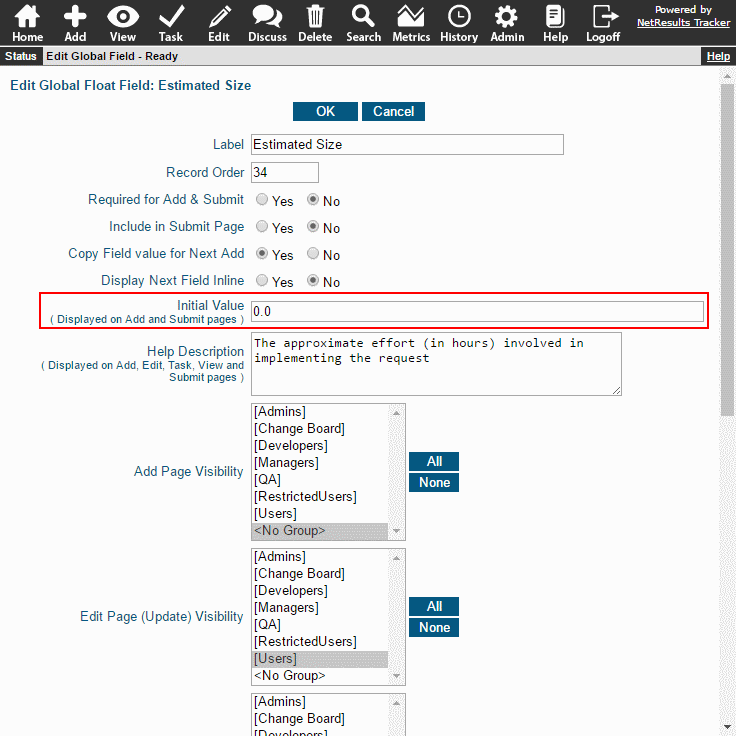
    • Floating Point, Integer, Text, TextArea or Url fields: Set the Initial Value.
  4. Click OK to save the change.

Initial Value for Floating Point Field

Set a Field Later in the Workflow

To initialize a field during the Task operation:

  1. Login as Admin and click on the Admin icon.
  2. Click on the Workflows link.
  3. Select the desired workflow in the pulldown at the top.
  4. Locate the States section and click on the Manage link to the right.
  5. Click on the state that has the transition you wish to modify, then click on the Transitions button.
  6. Click on the Task Fields button.
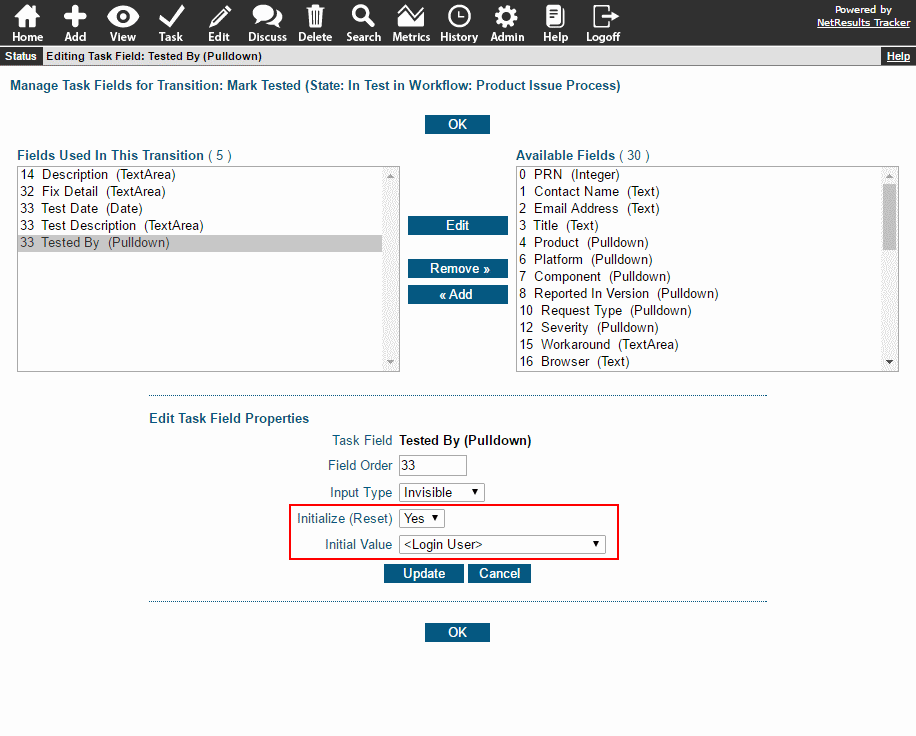
  7. Click on the desired field in the right column and click Add (or simply click on the field if it's already added and click on the Edit button).
  8. Use the information about Task Field Properties in the Online Help Guide based on the field type.
  9. Click Update to save the change.

Initialize a Pulldown During Task

A formal workflow is not necessary for every process.

A Tracker project can be set up without a workflow. Perhaps you just want to keep a list of records such as contacts, training documents or part numbers. These items can even be assigned to someone without a workflow in place.

Project

First, decide whether you will create a new project or use an existing one.

Add a Form

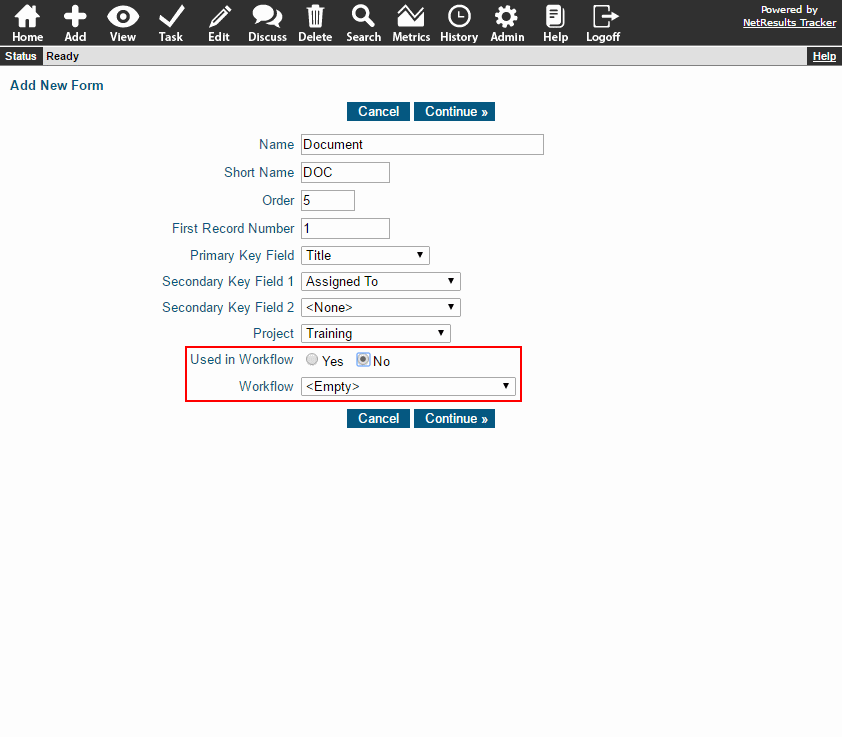
Then, create a form. Set the Used in Workflow property to "No". This will select "<Empty>" for Workflow. This will also hide the Status and Assigned To fields on the Add, Edit, View, Query and Home pages.

Create a Form without Workflow

Add Fields to the Form

Create the fields you wish to include on the form.

User Group Privileges

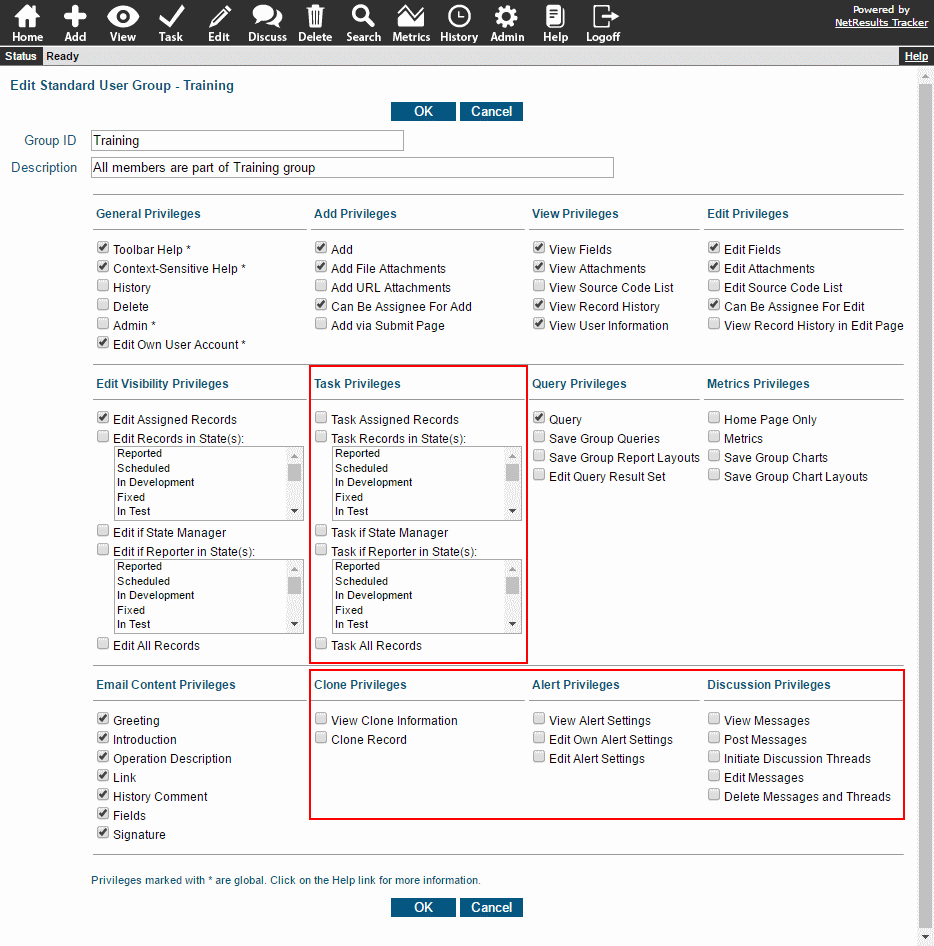
If you want to minimize the fields and features displayed for this process, create a user group with only the bare minimum privileges and give it access to this project & form. Since there is no workflow, the Task privileges are not needed and that icon will be removed from the toolbar.

Minimal User Group Privileges

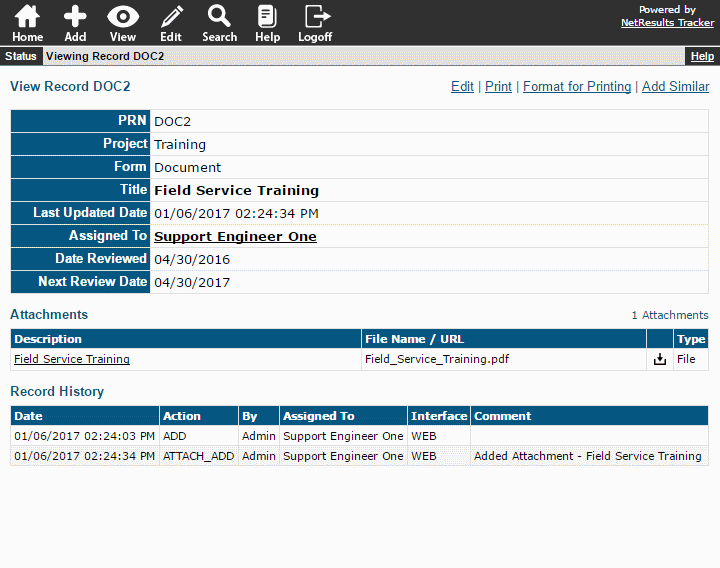
Disabling all privileges in the Clone, Alert and Discussion sections will remove those sections from the View Page.

View Page of Simple Form

Use Edit to Update Records

Make changes to these records using the Edit operation.

Need Help?

NetResults Technical Support can answers questions about forms without workflow and can even help you with the set up.

Provide quick instructions or background on an action being performed and other ways to use this versatile field.

Explain Why the Record is Being Modified

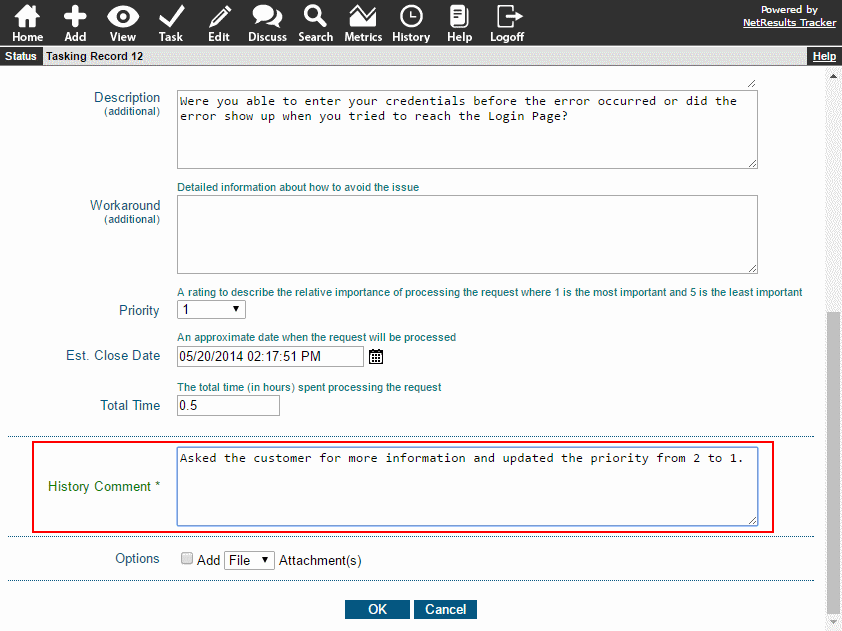
The History Comment is available during the Task and Edit operations. You can configure it to be required so that a user is forced to enter something when they are modifying a record. One reason to require a History Comment is to explain why a record is being updated. For example, if you have a transition called "Update" where a user can note progress made on a record, the History Comment can be used to specify what was changed ("Added more detail to requirements" or "Changed the test plan").

History Comment During Task Operation

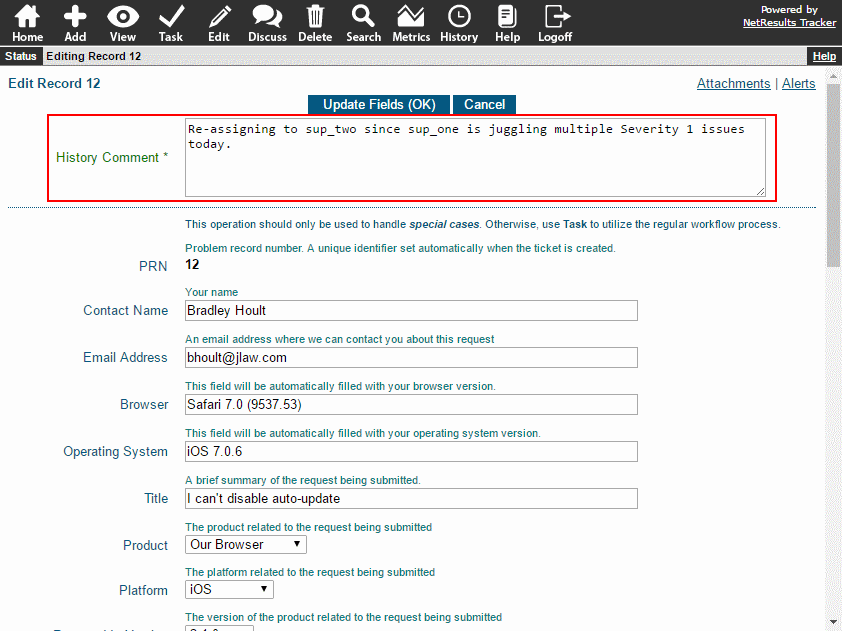
Another example: Perhaps the Edit operation is reserved only for special cases. You can require the History Comment for the Edit operation so the user can make note of the circumstances.

History Comment During Edit Operation

Make the History Comment Required

During the Task Operation:

  1. Login as Admin and click on the Admin icon.
  2. Click on the Workflows link.
  3. Select the desired workflow in the pulldown at the top.
  4. Locate the States section and click on the Manage link to the right.
  5. Click on the state that has the transition you want to modify, then click on the Transitions button.
  6. Click on the Edit button to the left of the transition.
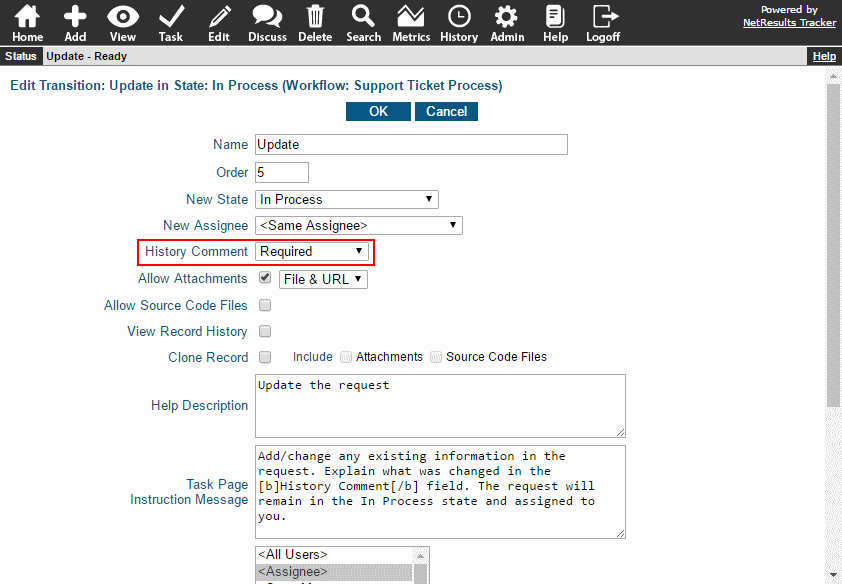
  7. Set History Comment to "Required" and click OK to save the change.
History Comment Transition Property

During the Edit Operation:

  1. Login as Admin and click on the Admin icon.
  2. Click on the Projects link.
  3. Select the desired project in the pulldown at the top.
  4. Locate the Forms section and click on the Manage link to the right.
  5. Click on the desired form, then click on the Properties button to the left of the Forms list.
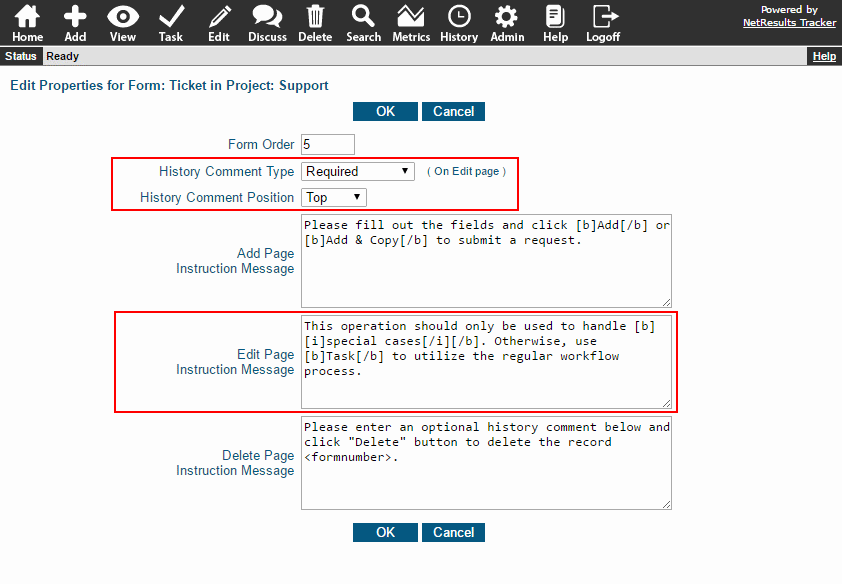
  6. Set History Comment Type to "Required". Optionally, you can set the History Comment Position and modify the Edit Page Instruction Message.
  7. Click OK.

History Comment Form Property

Provide Instructions for the Next Assignee

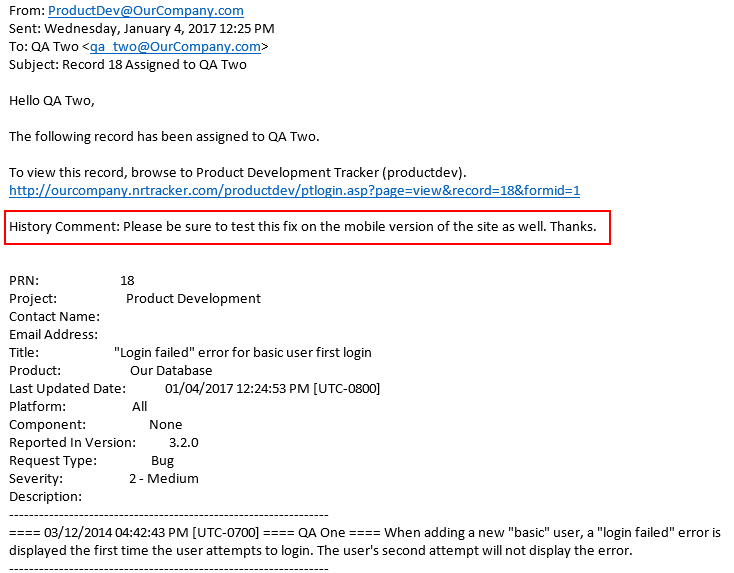
The History Comment can be displayed at the top of email notification messages, providing an easy way to include background or instructions for the next user assigned to the record.

History Comment in Email Notification

Include the History Comment in Email Notifications

The History Comment can be included in email notifications based on user group privileges. Therefore, you can show the history comment for some user groups and hide it from others.

  1. Login as Admin and click on the Admin icon.
  2. Click on the User Accounts link.
  3. Click on the Manage Groups button.
  4. Click on the Edit button to the left of a user group.
  5. Locate the Email Content Privileges section at the bottom of the page.
  6. Check the box for History Comment to include it in the email notifications.
  7. Click OK to save the change.
Use Key Words to Search the History

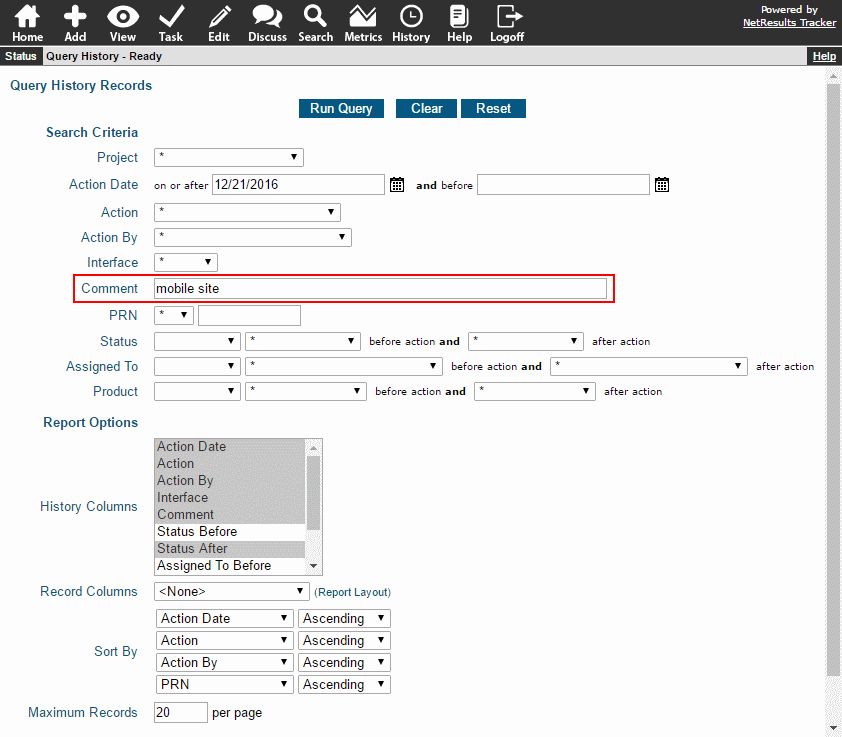
You can search for specific entries in the history using key words in the History Comment field. Information about running a history query can be found in the Online Help Guide.

History Search

Use Metrics to review your process and find steps that can be improved.

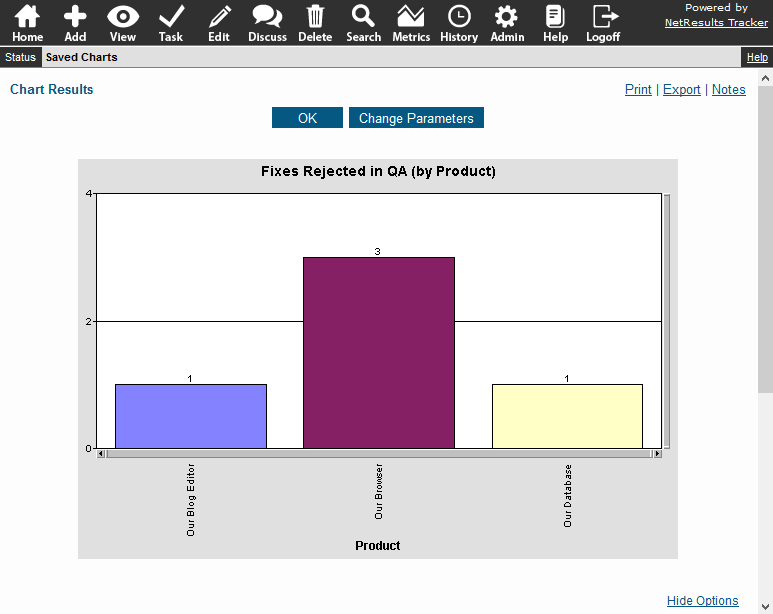
A workflow step that involves testing or approval is an easy place to start. For example, you can run a chart that shows how many fixes have been rejected by QA.

Fixes Rejected By QA

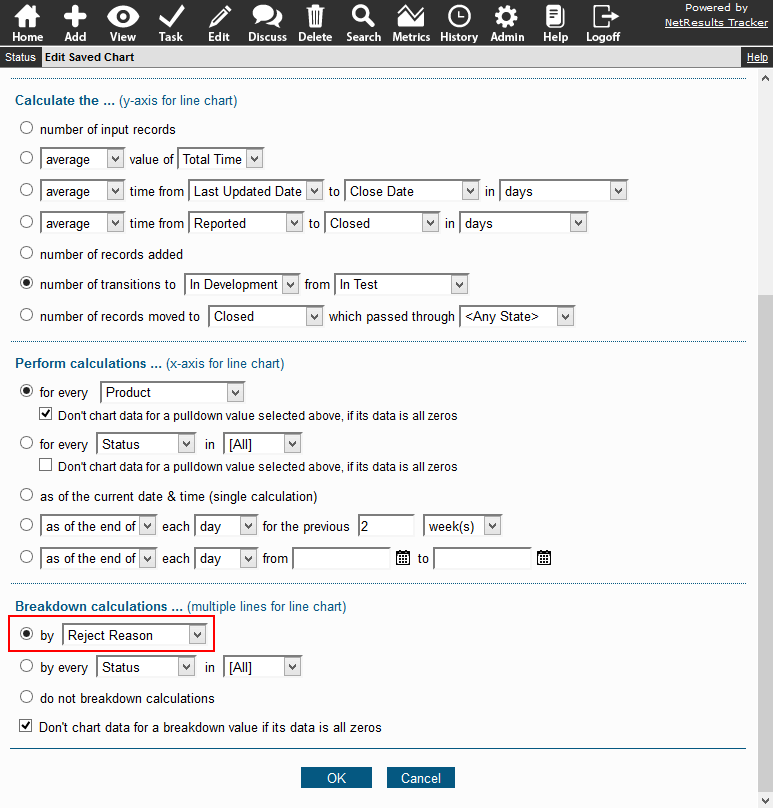
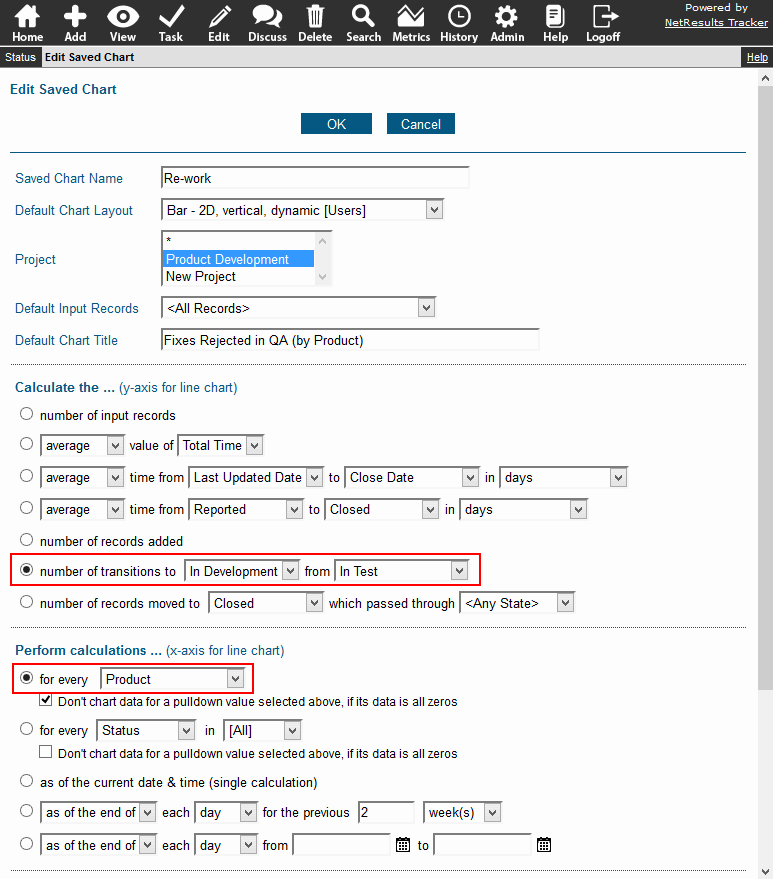
This is done using the chart option that calculates how many records moved from one state to another. You can break the data down by a pulldown as we've done with Product.

Chart Options

Reviewing the data can help you identify categories or trends. You may find it helpful to create a pulldown field that categorizes the reasons for rejecting a fix so that reports can be run against that criteria. You can use this field to break down the chart data even further.

Reject Reason

Detailed steps for creating a chart can be found in the Online Help Guide.